


For the final part of our three part series, we’ll now be exploring how you can give your clients a brunette balayage. Whether your client is after rich chocolate or light chestnut, this type of balayage allows you to create a sweeping multi-tonal look that adds dimension and radiance to a naturally dark base.
A Spotlight on Balayage Part 3: Brunette Balayage
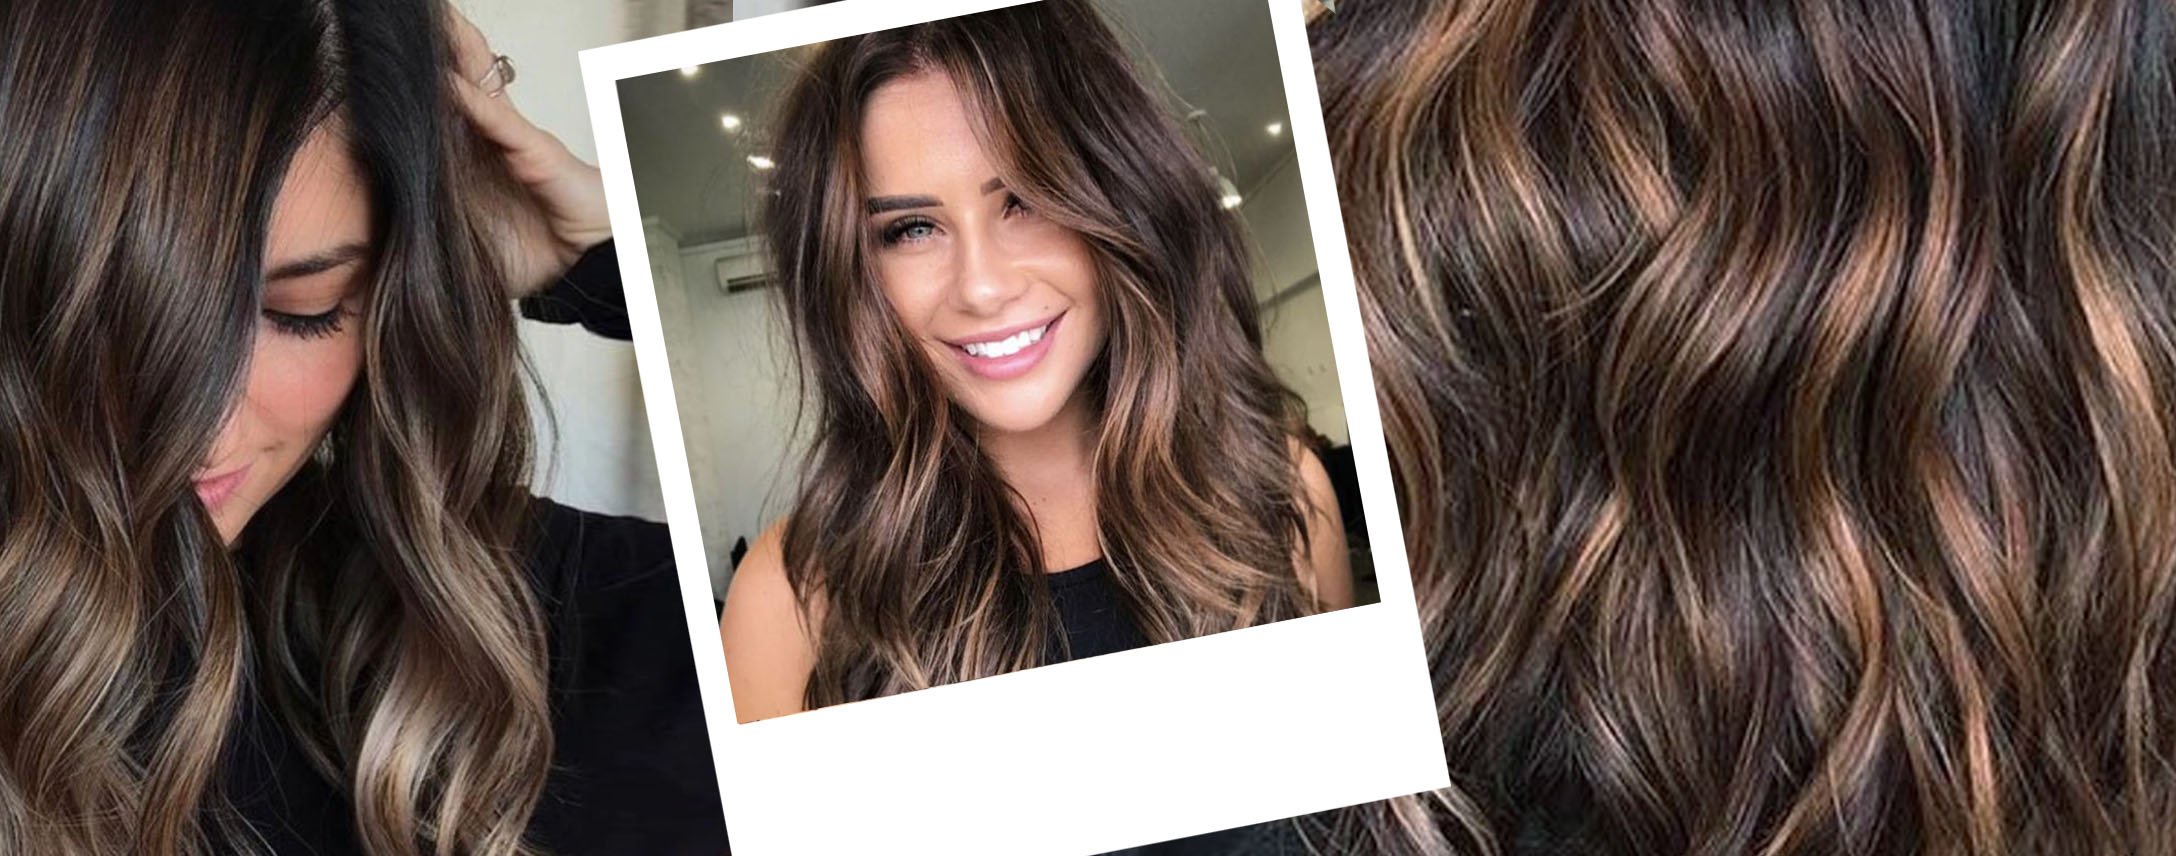
Part Three: Brunette Balayage
As this is normally a brown-on-brown look, it’s important to choose the right colours that frame your client’s face when creating a glossy balayage on brunette hair. If you want tips on application and to learn about other types of balayage, check out the rest of the series focussing on a blonde balayage and caramel balayage.
The Consultation: When is a brunette balayage not achievable on a client?
Blonde and red shades
A brunette balayage is designed to add dimension and shine to hair that has a base level of 4-6. While it uses colour that’s a maximum of two shades lighter than the base, you shouldn’t really attempt it on a blonde or red base. If your client plans on getting their hair dyed brunette followed by a balayage with a lighter brown, be sure to inform them it may take several sessions depending on its condition.
Clients who have used at-home hair dye
While it is possible to perform a balayage on a client who’s used an at-home dye, you will need to remove it beforehand. Depending on the type, and your client’s past colour history, you can remove it using Colour Undo and perform their balayage on the same day without damaging the hair.
Porous hair
Porous brunette hair is susceptible to breakage, and bleaching it may cause further damage. Depending on the hair’s condition, you can repair its broken bonds during your client’s appointment by adding the Olaplex No.1 Bond Multiplier into your balayage dye. After the dye has developed, follow up with the Olaplex No.2 Bond Perfector as an additional backbar treatment.
Brunette Balayage Recipe Guide (base level 4 or 5)
Step One
Using the V-section technique from part one of this blog series, lift your client’s hair to level 7 or 8 with your chosen bleach powder and developer. Leave to develop for the recommended time and wash out thoroughly.
Step Two (optional)
If there is still brassiness in your client’s hair following their bleaching, use one of the following toners to neutralise oranges. Mix in with the appropriate developer at a 1:1 ratio and leave to develop for 5 to 15 minutes before rinsing out.
Shop your brunette toners
MEGA DEAL
Exclusive

€ 7,25
ex VAT
5+ 1L DEVELOPER OR TUBE COLOUR FREE | 8+3 FREE
<ul><li>Professional ammonia-free demi-permanent hair colour</li><li>Low commitment; colour gently fades over 24 washes with up to 50% grey coverage</li><li>Enriched with Keratin and shine polymers to smooth the hair's surface, deliver extraordinary softness and a brilliant shine</li><li>Perfect for refreshing previous colour, and toning natural or bleached hair</li><li>100ml tube means great value</li></ul>
MEGA DEAL
Exclusive

€ 10,60
ex VAT
5+ 1L DEVELOPER OR TUBE COLOUR FREE | 8+3 FREE
<ul><li>Glycerin, wheat protein and pro-vitamin B5 repair, condition and protect hair</li><li>Lifts hair up to 4 levels</li><li>Provides 100% grey coverage</li><li>Offers long-lasting colour with intense shine</li></ul>
MEGA DEAL
Exclusive

€ 9,05
ex VAT
5+ 1L DEVELOPER OR TUBE COLOUR FREE | 8+3 FREE
<ul><li> Extensive permanent hair colour range with 100% grey & white coverage </li><li> Powered by Triple Color Technology™ with high performance pigments for bold, long-lasting colour and even coverage </li><li> Panthenol and Plant Protein conditioning agents regenerate the hair and protect the cuticle during colouration </li><li> Shade specific, low ammonia and alkali concentrations </li><li> PPD free, cruelty-free, and certified with The Vegan Society </li></ul>
Learn more about our colour ranges and switch and save offers that will help you create incredible Balayage looks. XP Colour is a great place to start; an easy to work with formulation, twice the product per tube and an incredible shade range for brunettes.
Learn more about our XP Colour Collection
Recent Posts
01 July 2026 |
Posted
by
Salon Services
in
Business
01 July 2026 |
Posted
by
Salon Services
in
Business
04 June 2026 |
Posted
in
Hair
Recently Viewed Products
MEGA DEAL
Exclusive

€ 7,25
ex VAT
5+ 1L DEVELOPER OR TUBE COLOUR FREE | 8+3 FREE
<ul><li>Innovative high quality pigments provide excellent coverage</li><li>Rosemary oil aids optimum coverage, shine and condition</li><li>Nine essential herbs preserve hairs natural beauty and health</li><li>Range includes 75 shades and 4 developers</li><li>Up to 100% grey coverage</li></ul>